Showing posts with label Ninaste tube. Show all posts
Showing posts with label Ninaste tube. Show all posts
Thursday, March 20, 2014
Bad Romance

This tutorial is my property, written by Jeannine’sTag,
any resemblance to another tutorial is a coincidence.
Do not share my tutorial, send a link to my blog.
Do not share my tutorial, send a link to my blog.
Supplies Needed:
PSP 9 (any version should work).
Tube of choice
Mine is "Lady Bug Princess" made by Ninaste
You may not
use this tube without licence
Tube can buy
on BEEHIVE Studio
You can buy the kit on Pimp My Tags w/Scraps
Font of choice
Mask 27 made by Millie
Drop shadow: 2 - 2 – 50 – 7
Lets get started…..!
Open template – shift D – delete credit - image canvas size 800 x 800
center
Highlight
Background - select all -open paper 7- c/p into
selection– select none - apply the mask – layers merge group
1 & 2- select all –
selection float – defloat - open paper 4 – copy & paste as new layer –
selection invert – delete – add drop shadow
3 - select all –
selection float – defloat - open paper 5 – copy & paste as new layer –
selection invert – delete – add drop shadow
5 - select all –
selection float – defloat - open paper 6 – copy & paste as new layer –
selection invert – delete – add drop shadow
9 - select all –
selection float – defloat - open paper 3– copy & paste as new layer –
selection invert – delete – add drop shadow
Open
elements and resize (if needed):
Never work on the original design - always
shift D
(Be careful when you resize or
rotate it is sometimes
necessary to sharpen)
Circle stitches - original size - image mirror
Heart swirl -
original size
Dangly - width 150
Buttom - width 200
Frame 1 - width 300
Heart 2 - width 250 -
rotate free left 20°
Heart on stick -
width 200
Glitter splat - width
250
Glitter splat 2 -
width 250
Bubble - width 250 -
duplicate - image mirror
Place all items (look at my tag for example)
Copy - Paste your tube as new layer. Resize if need it.
Add copyright info. Merge visible.
Add your name
Save as png or jpg.
Enjoy
this tutorial and I'd
like to see your results, you can
email me
Friday, February 28, 2014
Luck of the Irish
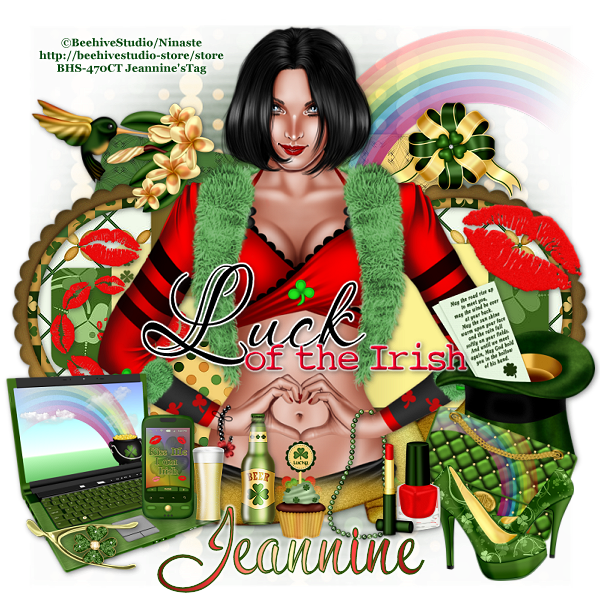
This tutorial is my property, written by Jeannine’sTag,
any resemblance to another tutorial is a coincidence.
Do not share my tutorial, send a link to my blog.
Do not share my tutorial, send a link to my blog.
Supplies Needed:
PSP 9 (any version should work).
Tube of choice
Mine is "Patty Devill" made by made by
Ninaste
You may not
use this tube without licence
Tube can buy
on BEEHIVE Studio
PTU scrapkit "Magically Delicious" made by
Sweetened by CandyCats
You can buy the kit on
Pimp My Tags w/Scraps
Template 521 made by Millie
Font of choice
Mask of choice
Drop shadow: 2 - 2 – 50 – 7
Lets get started…..!
Open template – shift D – delete credit - resize width 700 - image
canvas size 700 x 700 center
Highlight
Background - select all -open paper 4 - c/p into
selection– select none - apply the mask – layers merge group
1 - select all –
selection float – defloat - open paper 12 – copy & paste as new layer –
selection invert – delete – add drop shadow
2 & 3 - select all –
selection float – defloat - open paper 11 – copy & paste as new layer –
selection invert – delete – add drop shadow
4 & 5 - select all –
selection float – defloat - open paper 15 – copy & paste as new layer –
selection invert – delete – add drop shadow
6 & 7 - select all –
selection float – defloat - open paper 17 – copy & paste as new layer –
selection invert – delete – add drop shadow
8 & 9 - flood file
with a gold gardient - add drop shadow
10 - select all –
selection float – defloat - open paper 8 - shift d - resize width 400 – copy
& paste as new layer – selection invert – delete – add drop shadow
WA - adjust - color
balance - manual color correction choice color from tube/kit
Open
elements and resize (if needed):
Never work on the original design - always
shift D
(Be careful when you resize or
rotate it is sometimes
necessary to sharpen)
Frame 3 - width 350
Shoes - width 200
Kiss twirl - width
250
Laptop 2 - width 300
Phone 4 - width 100
Rainbow - width 400 -
image mirror
Bird 3 - width 250
Bow 8 - width 200
Hat - width 150
Purse 2 - width 200 -
rotate free right 20°
Ribbon 2 - width 700
Wish bone - width 150
Lipstick - width 60
Nail polish - width
70
Necklace - width 100
Kiss - width 260 -
rotate free right 20°
Cupcake2 - width 90
Beer - width 150
Place all items (look at my tag for example)
Copy - Paste your tube as new layer. Resize if need it.
Add copyright info. Merge visible.
Add your name
Save as png or jpg.
Enjoy
this tutorial and I'd
like to see your results, you can
email me
Tuesday, February 18, 2014
Sweet Candy Kisses

This tutorial is my property, written by Jeannine’sTag,
any resemblance to another tutorial is a coincidence.
Do not share my tutorial, send a link to my blog.
Do not share my tutorial, send a link to my blog.
Supplies Needed:
PSP 9 (any version should work).
Tube of choice
Mine "Sweet love" closeup made by Ninaste
You may not use this tube without licence
Tube can buy on BEEHIVE Studio
FTU scrapkit "Candy Treats" made by KittzKeationz
Valentine template 05 made by Justine
Font of choice mine is Jellyka - Love and Passion
Mask of choice
Drop shadow: 2 - 2 – 50 – 7
Lets get started…..!
Open template – shift D – delete credit - image canvas size 800 x 800
center
Highlight
Raster 1- select all - open paper 2 - copy and paste
into selection – select none - apply the mask – layers merge group
Top rectangle &
bottom rectangle - select all – selection float – defloat - open paper 1 – copy
& paste as new layer – selection invert – delete – add drop shadow
Top square & bottom
square - select all – selection float – defloat - open paper 3 – copy &
paste as new layer – selection invert – delete – add drop shadow
Right square & left
square - select all – selection float – defloat - open paper 7 – copy &
paste as new layer – selection invert – delete – add drop shadow
Middle rectangle -
select all – selection float – defloat - open paper 4 – copy & paste as new
layer – selection invert – delete – add drop shadow
Circle - select all –
selection float – defloat - open paper 1 – copy & paste as new layer –
selection invert – delete – add drop shadow
Top heart & bottom
heart - select all – selection float – defloat - open paper 2 – copy &
paste as new layer – selection invert – delete – add drop shadow
Open
elements and resize (if needed):
Never work on the original design - always
shift D
(Be careful when you resize or
rotate it is sometimes
necessary to sharpen)
Bow - width 220
Clouds - original
size
Teddy - width 200
Pearls - original
size
f3 - width 250
Heart - width 200
Candy box - width 200
Bow 1 - width 200
Cupcake - width 120
Dome with cake yummy
- width 200
Iced cream candy
topper - width 150
Iced cream cake -
width 120
Beaded string - width
400 - rotate free left 20°
Sweet 2 - width 100
Sweet 1 - width 120
Ice cream cone -
width 120
Cherry lips - width
200 - rotate free right 20°
Heart balloon -
original size
Place all items (look at my tag for example)
Copy - Paste your tube as new layer. Resize if need it.
Add copyright info. Merge visible.
Add your name
Save as png or jpg.
Enjoy
this tutorial and I'd
like to see your results, you can
email me
Subscribe to:
Comments
(Atom)
My Blog List
-
-
NEWS6 years ago
-

Weather in Liège
