Friday, October 7, 2011
Proud PTU

This tutorial is my property, written by Jeannine’sTag,
any resemblance to another tutorial is a coincidence.
Do not share my tutorial, send a link to my blog.
Do not share my tutorial, send a link to my blog.
Supplies Needed:
PSP
Tube “Burlesque” from ©Brabara Jensen
Exclusive by SATC
You may not use this artwork without first obtaining a license.
PTU ScraptKit “Proud” from RebelDezigns
Buy this on PTE
Drop shadow: 2 - 2 –75 – 8
Plugin MuRa’s Filter Meister - copie
Open new image 600 x 600
“Element37” resize width 400 – paste as new layer
with the magic wand select inside the frame – selection – modify – expand 3
Open paper1- shift D – resize 500 – copy and paste as new layer
Selection invert – delete – move down the frame
Element 5 resize width height 300 – copy and paste – Mura’s Meister – Copie

Open and resize the following elements:
22 – width 200
2 – width 120
30 – width 80
1 – width 280
3 – height 150
49 – width 180
4 – width 120
7 –height 480
Add your name and copyright info.
I use for write the paper 6 for background
Merge visible.
Resize mine width 500
Save as png or jpg.
Have fun…..
Another example with ©Elias Chatzoudis "Hope"
on PTE

Hallow_Candy IM Stat

How to create a stat for Incredimail
You need to have Incredimail Letter Creator
Open PSP
Open a new image 1600 X 400
Select all flood with a paper file or a color, if you use a paper you need to go to "Effects - Image Effects, Seamless Tiling with these setting
Select all flood with a paper file or a color, if you use a paper you need to go to "Effects - Image Effects, Seamless Tiling with these setting
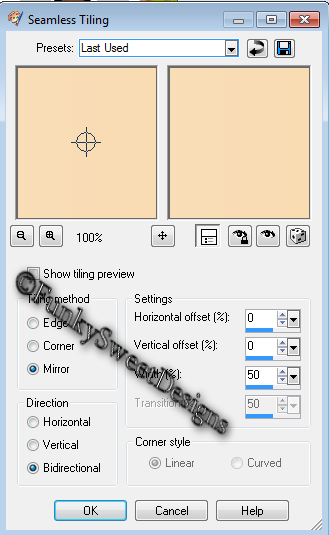
Open resize elements no larger than 300 pixels, copy and paste.
Save as PNG
Open Letter Creator:
Open image - mosaic - move the margin after the border - select the text color
Save as PNG
Open Letter Creator:
Open image - mosaic - move the margin after the border - select the text color

If you want to put a tag at the top of the page go to "header" in the table to put down "center" and click on image, choose your image
Remember to add information in the "Footer"
Finish and save & add to Incredimail
Thursday, October 6, 2011
Be A Fighter FTU

This tutorial is my property, written by Jeannine’sTag,
any resemblance to another tutorial is a coincidence.
Do not share my tutorial, send a link to my blog.
Do not share my tutorial, send a link to my blog.
Supplies Needed:
PSP
Tube of choice. I am using “BlackWidow02” from Ismael Rac
ou may not use this artwork without first obtaining a license to do so.
You may obtain that license at HERE
FTU kit “ from A Fighter” by Shal’s World
Exclusive from CreativeMisfits
Template “Wiches bca” from CreativeScrapsByCrys
Word Art #2 created by Jill
Mask of choice
Font: PassionsConflict (Pay Font)
Drop shadow: 2 - 2 –75 – 10
Open template – shift D
Close original
Remove “credit”
Resize width 550
Image canvas size 600 x 600 bottom
New raster layer, arrange, send to bottom
Select all – open paper 12 – paste into selection
Apply the mask – merge group
Activate “Merged 1 (circle)”
Step 1: selection –select all – float – defloat – modify
Smooth

Open paper 7
Shift D – resize 500
Copy – paste
Selection invert – delete
Activate “Merged and copy of merged (lines)” adjust – color balance
choice a color from you tube
Repeat this step for
“Raster 3” with paper 10
“Raster 2” with paper 12
Open elements (shift D and close original)and resize (if need)
(don’t forget to “sharpen” when you resize, if necessary)
“Fighter Spiral 1” rotate 90 right
“element 6” resize to height 68 to paste on the hat
“element 1” height 85
“element 13” width 80
“element 9” width 120
“element 3” width 120
Place all items (look at my tag for example)
Copy - Paste your tube as new layer. Resize if need it.
Add your name and copyright info. Merge visible.
I resize mine width 500
If you resize don’t forget to adjust - sharpen
Save as png or jpg.
Have fun…..
Shattered Rage PTU

This tutorial was written for people have a working knowledge of PSP.
This tutorial is my property, written by Jeannine’sTag,
any resemblance to another tutorial is a coincidence.
Do not share my tutorial, send a link to my blog.
Do not share my tutorial, send a link to my blog.
Supplies Needed:
PSP
Tube from ©Amberly Berendson “GettingSpookyPack”
You may not use this artwork without first obtaining a license to do so.
Get it on MTA
PTU ScrapKit “ShatteredRage” by FoxyDesingz
Buy it HERE
Free photo from Google image
Mask of choice
Drop shadow: 2 - 2 –75 – 8
Plugin (optional): Eye Candy 4000 or Eye Candy 3.1 will work to
Font:
Open new image 600 X 600
Selection – select all
Open paper 6 – copy – paste into selection
Apply the mask – layers merge group
Open “Tree1” resize height 500
Paste on the left top side – duplicate –image mirror
Open you hallow image and paste as new layer
Open and resize the following elements:
“Gost” width 200
“Gate1” width 450
“Tombstone2” width 200
“BloodMoon” width 130 add gradient glow EC400 (optional)

“Bat1” width 85
“Rose2” width 200
“Shringe” width 150
“Razor” width 80
“BloodSplatter” width 65
“Knife” width 65
“Bottle” width 65
Place all items (look at my tag for example)
Add the elements from the tube pack
Add your name and copyright info. Merge visible.
Resize mine width 500
Save as png or jpg.
Have fun…..
Monday, October 3, 2011
Denim Girl PTU

This tutorial is my property, written by Jeannine’sTag,
any resemblance to another tutorial is a coincidence.
Do not share my tutorial, send a link to my blog.
Do not share my tutorial, send a link to my blog.
Supplies Needed:
PSP
You may not use this artwork without first obtaining a license to do so.
Get this on PTE
PTU scrapkit “Denim Days” from KNC Scrapz
Buy this on Scrappin Dollars
Mask 435 by Insatiable Dreams
Drop shadow: 2 - 2 –75 – 8
Font: Fontdinerdotcom
Open new image 600 x 600
Selection – select all
Open paper 2 – copy – paste into selection
Apply the mask – layers merge group
Open “Frame2” resize width 400 – paste as new layer
rotate free 20 left - with the magic wand select inside the frame – selection – modify – expand 3
Open paper 4 - shift D – resize 600 – copy and paste as new layer
Selection invert – delete – move down the frame
Open “Frame 1” resize width 350 – copy and paste
with the magic wand select inside the frame - selection – modify – expand 4
Open paper 6 – shift D – resize 600 – copy and paste as new layer
Selection invert – delete – move down the frame
Open and resize the following elements:
Flowers – width 250
Puddle – width 550
Chain – width 200 – rotate right 90
Motorcycle – width 120
Key – width 100 rotate right 105
Cloud – height 400 - duplicate
Waterdrops – height 120 multiply this 5 and paste overall on the tag
Place all items (look at my tag for example)
Add your name and copyright info.
I use for write the paper 6 for background
Merge visible.
Resize mine width 500
Save as png or jpg.
Have fun…..
Think Pink FTU kit & FTU tube

This tutorial is my property, written by Jeannine’sTag,
any resemblance to another tutorial is a coincidence.
Do not share my tutorial, send a link to my blog.
Do not share my tutorial, send a link to my blog.
Supplies Needed:
PSP
FTU tube “Survivor” from Ralf Straaberg
Thank For the tube Ralf
You may not use this artwork without first obtaining a license to do so.
FTU scrapkit “ThinkPink” by CBJ
Free BCA ribbon
Find tube and kit and ribbon on DSI
A special thank for this gift
Mask 435 by Insatiable Dreams
Drop shadow: 2 - 2 –75 – 8
Font: Fiolex Girl or Love (pay font)
Open new image 800 x800
Selection – select all
Open paper 11 – copy – paste into selection
Apply the mask
Open element 1 resize width 500 – paste as new layer
rotate free 60 right
Open element 31 – copy and paste
with the magic wand select inside the frame not to mention the small part right
under the ribbon - selection – modify – expand 4
Open paper 5 – shift D – resize 600 – copy and paste as new layer
Selection invert – delete – move down the frame
Open and resize the following elements:
10 – width 150
9 – width 200
8 – width 130
7 – width 130
4 – height 300
12 – height 300
13 – width 150
20 – width 250 (Write in the heart with font “Fiolex Girl”)
From ribbon kit : r 5 & g 3
Place all items (look at my tag for example)
Add your name and copyright. info. Merge visible.
Resize mine width 500
Save as png or jpg.
Have fun…..
Subscribe to:
Posts
(Atom)
My Blog List
-
-
NEWS6 years ago
-


